How to Install LUFA for Arduino USB Development

Inside the STEMTera™ Breadboard there are two micro-controllers, ATmega328P and ATmega32U2. When operating in normal Arduino mode, the ATmega328P interacts with external devices and the ATmega32U2 act as a TTL to USB converter. Both working together as an Arduino UNO board.
Since the IO pins of the ATmega32U2 are exposed on the tie points of the STEMTera™ Breadboard, we can fully utilise the IO pins of the ATmega32U2 and use it as an independent micro-controller. The ATmega32U2 is a very useful micro-controller for USB device development because of its native USB capability. In order to utilise the USB capability of the ATmega32U2 inside the STEMTera™ Breadboard, we need to install the LUFA framework.
There are 6 steps to install the LUFA USB framework for Arduino:
- Step 1 - Install AVR Toolchain
- Step 2 - Install DFU Programmer
- Step 3 - Install DFU Driver
- Step 4 - Install MinGW
- Step 5 - Install LUFA
- Step 6 - Compile & Execute STEMTera™ Breadboard HID Keyboard Demo
- Step 7 - Restoring STEMTera™ Breadboard to Factory Default
In this guide, we will go through each of the steps in setting up the LUFA development environment for the ATmega32U2.
Step 1 - Install AVR Toolchain
In order to compile the source code of LUFA we need the AVR Toolchain from Atmel. The Atmel AVR 8-bit and 32-bit Toolchain 3.4.1 is recommended because this version has all the required tools.
Download the recommended AVR Toolchain from
Atmel AVR 8-bit and 32-bit Toolchain 3.4.1
Once the download is completed, execute the EXE file and proceed with the installation. When asked to choose for features and folder, just click Next to proceed with the default selection.

After the installation is completed, type
Win + r
In the open dialog box, type
cmd
then click OK. A Command Prompt window will be displayed. On the Command Prompt window type,
avr-gcc -v
You should see the avr-gcc environment settings and version number as below:

AVR Toolchain is now installed on your computer.
If you can’t see similar result as above, the AVR Toolchain was not properly installed. Please try Step 1 again.
Step 2 - Install DFU Programmer
dfu-programmer is a multi-platform command line programmer for Atmel micro-controllers with a USB Device Firmware Upgrade (DFU) bootloader. The ATmega32U2 inside the STEMTera™ Breadboard comes pre-programmed with the USB DFU bootloader.
Download the dfu-programmer from
For Linux/Mac download the tar gz source for the dfu-programmer from Linux/Mac DFU Programmer 0.7.2
Once the download is completed, unzip the package to a temporary location. Copy dfu-programmer.exe to the bin folder of the AVR Toolchain (default AVR Toolchain’s bin folder is at C:\Program Files (x86)\Atmel\AVR Tools\AVR Toolchain\bin)

When copied correctly, you can see that the dfu-programmer.exe is in the same folder as the other tools like, date.exe, dd.exe, df.exe, echo.exe and etc.
dfu-programmer is now installed with the AVR Toolchain.
Do not remove the unzipped files of the dfu-programmer, they are needed for DFU driver installation later.
Step 3 - Install DFU Driver
When the ATmega32U2 of the STEMTera™ Breadboard operates in DFU mode, it requires DFU driver to work properly.
Connect the STEMTera™ Breadboard to the computer, if you have not connect the STEMTera™ Breadboard to your computer before, please refer to the STEMTera™ Breadboard Beginner’s Guide section Connect the STEMTera™ Breadboard.
Type the following to launch device manager:
Win + r
In the open dialog box, type
devmgmt.msc
then click OK. Device Manager will be launched and display a list of devices connected to the computer. Double click ![]()
Ports (COM & LPT) and the name of the STEMTera™ Breadboard’s serial port should look like ![]()
Arduino Uno (COMx)
Now, we need to make the ATmega32U2 to operate in DFU mode. To do that, use a jumper wire, connect one end of the jumper wire to GND and the other end to RST2. While the jumper is still connected to GND and RST2, you will notice that the serial port of the STEMTera™ Breadboard has disappear from device manager.
Remove the jumper wire and Windows will pop up a message saying a new device is found and it will try to locate the driver for it. Because DFU driver is not officially in Windows’ driver repository, the search for the driver will most likely failed.
When this happens, you will see a device called Arduino Uno DFU with an exclamation mark shown under Other devices in the device manager.

Right click on this device and select Update driver.

On the Update driver window, select Browse my computer for driver software. Click Browse button and navigate to the dfu-programmer folder that was previously unzipped in STEP 2. The folder’s name is as below:
dfu-programmer-win-0.7.2\dfu-prog-usb-1.2.2
Click next after selecting the above folder and Windows will start to install the driver. Click Install when the driver installer ask “Would you like to install this device software?” If the installation went well, you will see the following screen.

Click Close and the DFU driver installation is now completed.
Step 4 - Install MinGW
MinGW, a contraction of “Minimalist GNU for Windows”, is an open source software development environment for Windows. It includes a port of the GNU Compiler Collection (GCC), GNU Binutils for Windows and miscellaneous utilities.
Download MinGW installer from
Once the download is finished, execute the installer mingw-get-setup.exe. Click Install follow by Continue to install as default preference. The installer will start to download and update necessary catalogue files. Once this process is completed, click Continue.
MinGW Installation Manager screen will be displayed as below:

Click mingw32-base and select Mark for Installation.
Click msys-base and select Mark for Installation.
When properly marked for installation, the checkbox next to the selected item will show an arrow that looks like a letter C.
Click Installation menu, then select Apply Changes. When the Schedule of Pending Actions window ask Okay to proceed?, click Apply and the installer will start to download the required files. Wait for the installer to show All changes were applied successfully; you may now close this dialogue., then click Close. Click X of the MinGW Installation Manager to exit.
The installation of MinGW is now completed.
Step 5 - Install LUFA
Download LUFA-151115 from
STEMTera LUFA Development files
Unzip STEMTera-Breadboard-B328-LUFA-Demo-Project-master.zip to the Desktop. The resultant should have a folder structure like below:
C:\Users\[user name]\Desktop\STEMTera-Breadboard-B328-LUFA-Demo-Project-master
You could use git to clone the project if you wish to. The project git is https://github.com/STEMTera/STEMTera-Breadboard-B328-LUFA-Demo-Project.git
LUFA is now installed on your Desktop.
Step 6 - Compile & Execute STEMTera™ Breadboard HID Keyboard Demo
Type
Win + r
In the open dialog box, type
cmd
then click OK. A Command Prompt window will be displayed. On the Command Prompt window type,
cd "Desktop\STEMTera-Breadboard-B328-LUFA-Demo-Project-master\Demos\Device\ClassDriver\Keyboard"
Type
dir
You should see the following files in the directory:
 Directory of C:\Users\jplie\Desktop\STEMTera-Breadboard-B328-LUFA-Demo-Project-master\Demos\Device\ClassDriver\Keyboard

20/10/2017  02:13 PM    <DIR>          .
20/10/2017  02:13 PM    <DIR>          ..
20/10/2017  02:04 PM             2,472 asf.xml
20/10/2017  02:04 PM    <DIR>          Config
20/10/2017  02:04 PM             8,256 Descriptors.c
20/10/2017  02:13 PM            12,672 Descriptors.d
20/10/2017  02:04 PM             3,368 Descriptors.h
20/10/2017  02:13 PM            10,720 Descriptors.o
20/10/2017  02:04 PM           104,419 doxyfile
20/10/2017  02:13 PM             4,328 Keyboard.bin
20/10/2017  02:04 PM             7,895 Keyboard.c
20/10/2017  02:13 PM            13,916 Keyboard.d
20/10/2017  02:13 PM                13 Keyboard.eep
20/10/2017  02:13 PM           128,022 Keyboard.elf
20/10/2017  02:04 PM             3,321 Keyboard.h
20/10/2017  02:13 PM            12,192 Keyboard.hex
20/10/2017  02:13 PM           165,766 Keyboard.lss
20/10/2017  02:13 PM           112,252 Keyboard.map
20/10/2017  02:13 PM            13,628 Keyboard.o
20/10/2017  02:13 PM             7,552 Keyboard.sym
20/10/2017  02:04 PM             2,444 Keyboard.txt
20/10/2017  02:04 PM             1,067 makefile
              19 File(s)        614,303 bytes
               3 Dir(s)  135,728,353,280 bytes free
Type
make
and make will start to compile the STEMTera™ Breadboard HID Keyboard Demo. Once the compilation is finished, the following make messages will be displayed.
 ../../../../LUFA/Drivers/USB/Class/Host/StillImageClassHost.o -o Keyboard.elf -lm -Wl,-Map=Keyboard.map,--cref -Wl,--gc-sections -Wl,--relax -mmcu=atmega32u2
 [OBJCPY]  : Extracting HEX file data from "Keyboard.elf"
avr-objcopy -O ihex -R .eeprom -R .fuse -R .lock -R .signature Keyboard.elf Keyboard.hex
 [OBJCPY]  : Extracting EEP file data from "Keyboard.elf"
avr-objcopy -O ihex -j .eeprom --set-section-flags=.eeprom="alloc,load" --change-section-lma .eeprom=0 --no-change-warnings Keyboard.elf Keyboard.eep || exit 0
 [OBJCPY]  : Extracting BIN file data from "Keyboard.elf"
avr-objcopy -O binary -R .eeprom -R .fuse -R .lock -R .signature Keyboard.elf Keyboard.bin
 [OBJDMP]  : Extracting LSS file data from "Keyboard.elf"
avr-objdump -h -d -S -z Keyboard.elf > Keyboard.lss
 [NM]      : Extracting SYM file data from "Keyboard.elf"
avr-nm -n Keyboard.elf > Keyboard.sym
 [SIZE]    : Determining size of "Keyboard.elf"

avr-size --mcu=atmega32u2 --format=avr Keyboard.elf
AVR Memory Usage
----------------
Device: atmega32u2

Program:    4328 bytes (13.2% Full)
(.text + .data + .bootloader)

Data:         53 bytes (5.2% Full)
(.data + .bss + .noinit)


 [INFO]    : Finished building project "Keyboard".

C:\Users\jplie\Desktop\STEMTera-Breadboard-B328-LUFA-Demo-Project-master\Demos\Device\ClassDriver\Keyboard>
If the make process is successful, you will see
[INFO] : Finished building project "Keyboard".
telling you that the “Keyboard” demo is compiled and ready.
To install the “Keyboard” demo to the STEMTera™ Breadboard, type
make dfu-launch
make will launch dfu-programmer to flash the “Keyboard.hex” into the STEMTera™ Breadboard. A successful flashing will have messages similar to:
 [DFU]     : Programming FLASH with dfu-programmer using "Keyboard.hex"
dfu-programmer atmega32u2 erase
Checking memory from 0x0 to 0x6FFF...  Not blank at 0x1.
Erasing flash...  Success
make: [dfu-launch] Error 5 (ignored)
dfu-programmer atmega32u2 flash Keyboard.hex
Checking memory from 0x0 to 0x10FF...  Empty.
0%                            100%  Programming 0x1100 bytes...
[>>>>>>>>>>>>>>>>>>>>>>>>>>>>>>>>]  Success
0%                            100%  Reading 0x7000 bytes...
[>>>>>>>>>>>>>>>>>>>>>>>>>>>>>>>>]  Success
Validating...  Success
0x1100 bytes written into 0x7000 bytes memory (15.18%).
dfu-programmer atmega32u2 launch --no-reset
As soon as make dfu-launch has finished, you should be able to see a HID Keyboard Device appear on the Keyboards section of Device Manager.
If there is no extra HID Keyboard Device showing, confirm that the dfu programming is successful, check for
0%                            100%  Programming 0x1100 bytes...
[>>>>>>>>>>>>>>>>>>>>>>>>>>>>>>>>]  Success
The above two lines show that programming of 0x110 bytes is successful.
0%                            100%  Reading 0x7000 bytes...
[>>>>>>>>>>>>>>>>>>>>>>>>>>>>>>>>]  Success
The above two lines show that dfu-programmer has successfully read back the “Keyboard.hex” that was programmed into the STEMTera™ Breadboard.
Validating...  Success
0x1100 bytes written into 0x7000 bytes memory (15.18%).
If the read back code compared with the original compiled hex code and produced a matched result, Validating... Success message will be displayed.
Ignore the line make: [dfu-launch] Error 5 (ignored), this is not an error. It was produced because the command dfu-programmer atmega32u2 erase returned a warning due to the device was not blank before erase.
STEMTera™ Breadboard HID Keyboard Demo is now installed on the board. Launch NOTEPAD on the computer and use a jumper wire to short GND and PB0 ( or PB1, PB2, PB3, PB4, PB5). Each pin will produce a character on NOTEPAD like a keyboard being typed.
Step 7 - Restoring STEMTera™ Breadboard to Factory Default
In order to restore your STEMTera™ Breadboard to factory setting, you need the factory firmware. Right click
the factory firmware link
and save the file to C:\STEMTeraFactory
Now, we need to make the ATmega32U2 to operate in DFU mode. To do that, use a jumper wire, connect one end of the jumper wire to GND and the other end to RST2. While the jumper is still connected to GND and RST2, you will notice that the serial port or the USB device emulated by the STEMTera™ Breadboard has disappeared from device manager.
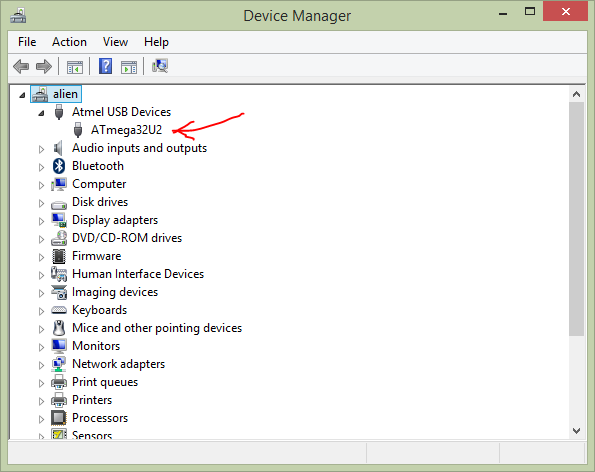
Remove the jumper wire and Windows will pop up a message saying a new device is found and if you have followed Step 3 correctly, ATmega32U2 DFU will show up in the device manager.
Type
cd C:\STEMTeraFactory
Type
dfu-programmer atmega32u2 erase
If the erase is successful, you will see the following status:
Checking memory from 0x0 to 0x6FFF...  Not blank at 0x1.
Erasing flash...  Success
Type
dfu-programmer atmega32u2 flash STEMTera-Breadboard-usbserial-32U2_FACTORY_DFU_COMBINED_2511.hex --suppress-bootloader-mem
Checking memory from 0x0 to 0x177F...  Empty.
0%                            100%  Programming 0x1780 bytes...
[>>>>>>>>>>>>>>>>>>>>>>>>>>>>>>>>]  Success
0%                            100%  Reading 0x7000 bytes...
[>>>>>>>>>>>>>>>>>>>>>>>>>>>>>>>>]  Success
Validating...  Success
0x1780 bytes written into 0x7000 bytes memory (20.98%).
Once you see the above status message, power off the STEMTera™ Breadboard by removing the USB cable. Re-plug the USB cable and your STEMTera™ Breadboard is now restored to factory default.